ANDROID UNIVERSITY
This page reviews the Android concepts that I learned in this remote course. For more information about CodePath and the courses they offer, visit codepath.org.
1. My Apps
CodePath Android University is a 6-week remote course where students develop apps using Android Studio. After each course, we spend each week either starting a new app or adding functionality to an existing app. We created 3 apps to learn the fundamentals of Android development, each modeling popular apps such as Twitter and Instagram. All of these projects can be found on my GitHub (click on the links).
Flixster
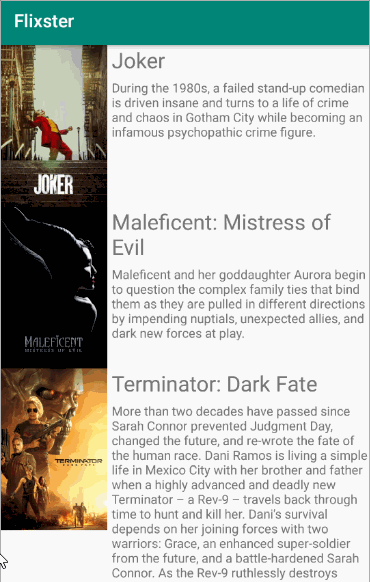
This app used the Movie Database API to allow users to view a list of currently popular movies. This project taught students how to:
- Retrieve data in a JSON format and parse the data
- Implement a
RecyclerViewto show the list of movies - Show more details of the movie by clicking on it, by navigating to a separate activity
- Use a YouTube player view to show the trailers and allow them to play in full-screen
- Create an alternate view of the app in landscape mode
Twitter Clone App
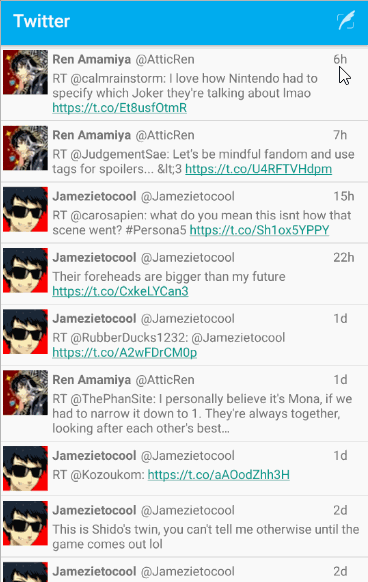
This app used the Twitter API to create a clone of the Twitter app, implementing its functionality. This project taught students how to:
- Use Twitter OAuth to allow the user to sign in
- Use get requests to retrieve the user's tweets
- Implement a
RecyclerViewto show the home timeline - Refresh the timeline by pulling down
- Persist tweets into the timeline so the user can view them offline, using SQLite
- Allow the user to scroll with infinite pagination
- Allow user to compose a new tweet
Instagram Clone App
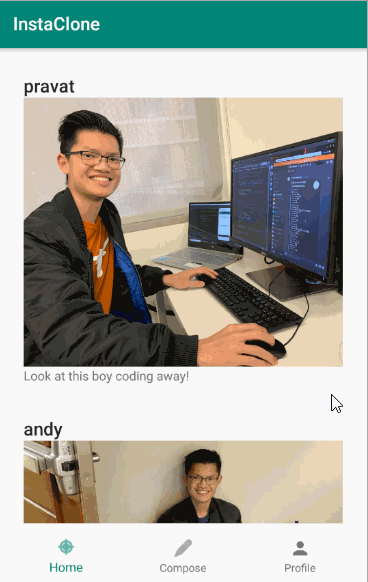
Rather than using the Instagram API, this app involved setting up our own Parse backend to build a new Instagram app from the ground-up, storing our own users and posts in a database. This project taught students how to:
- Use Parse authentication to allow users to sign up and log in
- Take a picture using the Camera app, and adding the photo to the database
- Implement a
RecyclerViewto show posts on the home screen (do you see a pattern here?) - Display each screen in fragments and switch between them within the main activity (using the bottom navigation view)
2. RecyclerView
In this course, the main layout for all our apps was a feed/timeline view, consisting of a RecyclerView. This is one of the best options in terms of memory and efficiency when working with large datasets. For the MovieDB API, we displayed a list for the 20 most popular movies, and the Twitter API allowed us to get each tweet in the timeline. But on an Android phone screen, users can only see a few items out of the dataset at a time.
Rather than allocating resources in memory for the items not in view, the solution is to only allocate memory and inflate views for the items that are shown on the screen. Then we bind new items to the views that we have already inflated. These views are basically "recycled" (hence the name).
Implementing a RecyclerView involves creating:
- A model class for the data
- An XML layout file to represent a single row of the
RecyclerView - An
Adapterclass to bind data to each view in theRecyclerView onCreateViewHolder: using the inflate method from theLayoutInflaterclass to inflate our layout, put it into a View, wrap it into a ViewHolder, and return it.onBindViewHolder: this method accepts a position, we go to that position in the list to get the item and call the bind method we defined.getItemCount: we usually set this as the size of our list with data.- Setting the adapter on the
RecyclerView
We usually create a class representing the data model being displayed by the RecyclerView, such as a Tweet, Email, Contact, etc., which contains fields with the information that will be displayed (username, title, description, etc.).
For example, let's make a simple Post model that consists of a name, body (basically a tweet), and a profile picture.
    public class Post {

        String name;
        String body;
        String profileImage; // this would be a URL

        // Let's say we're retrieving from JSON:
        public Post(JSONObject jsonObject) throws JSONException {
            name = jsonObject.getString("user");
            body = jsonObject.getString("text");
            profileImage = jsonObject.getString("profileImageUrl");
        }

        public String getName() { return name; } // put get methods for each field
    }
Usually, when making a feed view, we use a RecyclerView to contain all the items we want to display, such as tweets or e-mails. This involves making an XML layout file to edit how each item looks like. This is where we typically add an ImageView and TextView (for profile pictures, titles, usernames, descriptions, etc.). The height is usually wrap_content so the item is the size of its contents.
Here's what a simple post model could look like, with the profile picture in an ImageView, and the name and body each in a TextView. Setting ids for these is important so we can refer to these in the Java code.
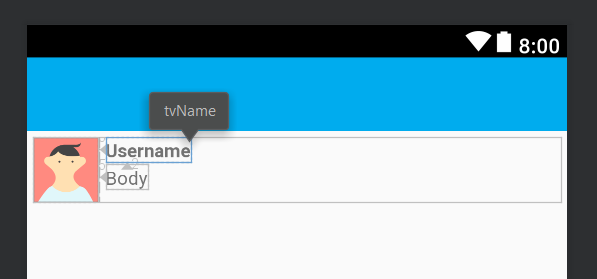
In an Adapter class, we usually define an inner ViewHolder class, which extends the default class. A ViewHolder is a representation of the single row that we just defined. We pass in the View for the row item and we define and get each component by their id.
    public class ViewHolder extends RecyclerView.ViewHolder {

        TextView tvName;
        TextView tvBody;
        ImageView ivProfileImage;

        public ViewHolder(@NonNull View itemView) {
            super(itemView);
            tvName = itemView.findViewById(R.id.tvName);
            tvBody = itemView.findViewById(R.id.tvBody);
            ivProfileImage = itemView.findViewById(R.id.ivProfileImage);
        }
We create the bind method in this inner class, which takes in the data to populate each component of the ViewHolder.
    public void bind(Post post) {
        tvName.setText(post.getName());
        tvBody.setText(post.getBody());
        // We need to import the Glide library to load in an image
        Glide.with(context).load(post.getProfileImage()).into(ivProfileImage);
    }
The Adapter class itself also extends the default class, which is parameterized by the ViewHolder that we just defined. Our constructor will have two parameters: a context (the class where the adapter is constructed from), and a list with our data.
    public class PostAdapter extends RecyclerView.Adapter<MovieAdapter.ViewHolder> {

    Context context;
    List<Post> posts;

    public PostAdapter(Context context, List<Post> posts) {
        this.context = context;
        this.posts = posts;
    }
Then we implement three required methods:
    // Inflates a layout from XML and returns the holder
    @NonNull
    @Override
    public ViewHolder onCreateViewHolder(@NonNull ViewGroup parent, int viewType) {
        // item_post is the xml file
        View postView = LayoutInflater.from(context).inflate(R.layout.item_post, parent, false);
        return new ViewHolder(postView);
    }

    // Populates data into the item through the holder
    @Override
    public void onBindViewHolder(@NonNull ViewHolder holder, int position) {
        Post post = post.get(position);
        holder.bind(post);
    }

    // Returns total number of items in posts
    @Override
    public int getItemCount() {
        return posts.size();
    }
Once we initialize the adapter in our main activity, we set the adapter and a layout manager on the RecyclerView. After adding to our list of data, we need to let the adapter know whenever the data changes so that it can re-render the RecyclerView.
    RecyclerView rvPosts = findViewById(R.id.rvPosts);

    // Create adapter
    final PostAdapter postAdapter = new PostAdapter(this, posts);
    // Set adapter on recycler view
    rvPosts.setAdapter(postAdapter);
    // Set a Layout Manager on the recycler view
    rvPosts.setLayoutManager(new LinearLayoutManager(this));

    // Later, after adding to the list of data
    postAdapter.notifyDataSetChanged();
3. Activities and Fragments
Every screen in an Android app is known as an Activity. An Activity is a combination of an XML layout file and a Java class.
In our apps, the main screen (where the feed usually is) is always referred to as MainActivity, but there can be other activities that we have to navigate to. For example, pressing a tweet on your Twitter timeline enlarges the tweet in a new activity. For apps with multiple activities, you can navigate between activities using intents.
Let's say we want to press on a post to view it on a separate activity. The new activity is represented by another class. We'll call this DetailActivity. We have to register a click listener to the entire post (inside the ViewHolder class in PostAdapter from the previous example), and then use an intent to navigate to the new activity. We use the putExtra method to pass data from one activity to another, using a key-value pair.
    // Refer to the entire container in the Adapter class
    RelativeLayout container;
    container = itemView.findViewById(R.id.container);

    container.setOnClickListener(new View.OnClickListener() {
        @Override
        public void onClick(View v) {
            Intent i = new Intent(context, DetailActivity.class);
            i.putExtra("name", post.getName());
            i.putExtra("body", post.getBody());
            context.startActivity(i);
        }
    }
Now we go to the DetailActivity and retrieve the data corresponding to the keys.
    String name = getIntent().getStringExtra("name");
    String body = getIntent().getStringExtra("body");
If an app uses a navigation tab to switch between screens, you can put multiple screens in the same activity. Such a screen is known as a Fragment.
A Fragment is a portion of an activity that is embedded within it, and is also a combination of an XML layout file and Java class. There should be a class for each fragment, extending the class Fragment. Fragments change the role of activities, as they become navigational containers responsible for presenting fragments.
For example, let's say we wanted a new Profile screen, so we create a new ProfileFragment class and a fragment_profile.xml file:
    public class ProfileFragment extends Fragment {

        private ImageView ivProfileImage;
        private TextView tvDescription;

        @Nullable
        @Override
        public View onCreateView(LayoutInflater inflater, ViewGroup parent, Bundle savedInstanceState) {
            // Defines the xml file for the fragment
            return inflater.inflate(R.layout.fragment_profile, parent, false);
        }
        @Override
        public void onViewCreated(View view, Bundle savedInstanceState) {
            // Setup any handles to view objects here
            ivProfileImage = view.findViewById(R.id.ivProfileImage);
            tvDescription = view.findViewById(R.id.tvDescription);
        }
    }
We then use a FragmentManager to add the fragment dynamically in our layout. We add a "placeholder" container called a FrameLayout to our activity, where the fragment is inserted at runtime.
To swap between fragments, we can use a bottom navigation drawer and handle the selection using a switch statement. The FragmentManager is responsible for replacing the contents of our FrameLayout with the selected fragment. Here's an example with the Instagram app's three fragments (Home, Compose, and Profile):
    bottomNavigationView = findViewById(R.id.bottom_navigation);

    bottomNavigationView.setOnNavigationItemSelectedListener(new BottomNavigationView.OnNavigationItemSelectedListener() {
        @Override
        public boolean onNavigationItemSelected(@NonNull MenuItem menuItem) {
            Fragment fragment = null;
            switch (menuItem.getItemId()) {
                case R.id.action_home:
                    fragment = new PostsFragment();
                    break;
                case R.id.action_compose:
                    fragment = new ComposeFragment();
                    break;
                case R.id.action_profile:
                    fragment = new ProfileFragment();
                    break;
                default:
                    break;
            }
            fragmentManager.beginTransaction().replace(R.id.flContainer, fragment).commit();
            return true;
        }
    });

      // We can set a default selection right here. It will load this fragment on the app's startup.
      bottomNavigationView.setSelectedItemId(R.id.action_home);